Are you looking to upgrade the sound system in your car? Installing aftermarket tweeters is a great way to get improved sound quality.
Tweeters are small speakers that produce high frequencies, allowing you to hear more detail and clarity when listening to music or audiobooks.
In this article, we’ll explain how to install car tweeters so you can enjoy better sound while driving safely.
Installing aftermarket tweeters correctly is essential for several reasons. First, if not done properly it could damage other components of your vehicle’s audio system.
Second, incorrect installation could result in poor sound quality from the tweeter itself. Finally, incorrectly installed tweeters can be dangerous because they may interfere with your ability to hear noises outside your vehicle, such as horns or sirens.
In this guide, we will cover all aspects of installing aftermarket car tweeters, including what tools you need, where to place them for optimal performance and how to wire everything together correctly.
With these tips and tricks, you will have no problem getting upgraded sound without compromising safety!
How To Install Car Tweeters
Car tweeters are small speakers that produce high-frequency sounds. They are usually installed in a car stereo system and help to enhance the sound quality of music.
Installing car tweeters easily with some basic knowledge and the right tools. In this guide, you will learn about what car tweeters are, as well as tips on how to install them.
When installing car tweeters, having all the necessary components and tools is important before beginning the installation process.
Having everything ready beforehand reduces the chances of running into problems during installation, making it easier and safer for you when working with electrical equipment.
This tweeter installation guide provides an overview of car tweeters, tweeter installation tips, and information about the necessary tools and components required for installation.
Tools And Components Required
Are you ready to start installing your car tweeters? Before you begin, there are some tools and components that you’ll need to make sure the installation is successful.
To ensure everything goes smoothly, gather all these items in advance: car tweeter installation tools, wiring connectors, mounting hardware for secure attachment, an amplifier setup if needed, and any other special components required for your tweeter.
Having all the necessary materials before beginning the installation process is important so that nothing gets overlooked or forgotten during setup.
This can save time and energy and potentially prevent damage to your vehicle or equipment. Now that you have everything together, we can connect the wiring!
Connecting The Wiring
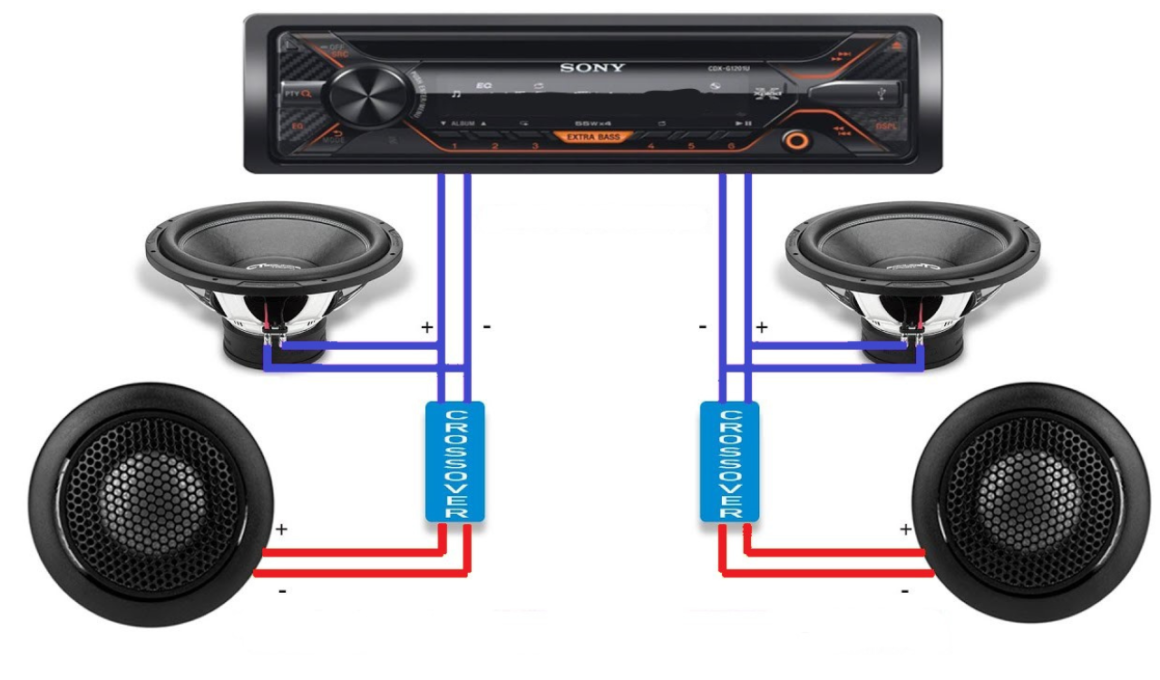
Now that you have all the tools and components needed to install car tweeters, it’s time to connect the wiring. Before getting started, make sure you have a car tweeter wiring diagram handy so you can easily follow along with instructions.

Start by connecting the positive terminal of each tweeter to the positive output on your amplifier or stereo system. Then attach the negative terminals of both tweeters to their respective ground connection points in your vehicle.
Make sure everything is securely connected before proceeding further. If any connections are loose, double-check them for tightness and confirm that they won’t come undone while driving.
Lastly, run cables from the amplifier/stereo to each tweeter box, then use zip ties or electrical tape to secure them in place for safety and convenience. Once all these steps are completed, you’ll be ready to mount the tweeters!
Mounting The Tweeters
Back in the day, when we wanted to install car tweeters, it was a daunting task. But nowadays, thanks to modern technology and products designed for easy installation, installing car tweeters has become relatively simple!

To begin the mounting process of your new car tweeters, you’ll need some basic tools such as screwdrivers and wrenches. You’ll also need a drill to mount them on the door panels instead of using screws.
Once you have all these items ready, remove any parts or covers that may obstruct the tweeter’s placement area.
Then position each tweeter firmly against the surface where they will be mounted. Mark out the holes with a marker pen before drilling so that everything is accurate and secure once installed.
After marking out the holes, use a drill bit slightly larger than the size of your mounting screws to make pilot holes on both sides of each tweeter.
Now attach one side of your tweeter securely with two screws while supporting its weight from underneath with one hand. Repeat this same process for attaching the other side until both sides are tightly secured.
Completing this step means our car tweeters are now safely attached and ready for testing and troubleshooting!
Testing And Troubleshooting
Once you’ve installed your car tweeters, it’s time to test them out. This is an important step in the tweeter installation process because it allows you to diagnose any potential problems that may have occurred during the installation.
Testing and troubleshooting will help ensure everything is done correctly and your speaker system is safe and working properly.
When testing car tweeters, turn on your vehicle’s sound system. Listen for any distortion or loudness issues from the speakers.
You should also check to see if any rattling noises are coming from inside the doors when playing music at higher volumes – this could indicate a loose connection or wiring issue with the tweeter installation.
If all seems normal, turn up the volume until you can hear some finer details of the music, such as highs and lows – these should be clear without sounding muffled or distorted.
If you experience problems after testing and troubleshooting, try adjusting the speaker levels within your audio settings.
Ensure that each channel has been adjusted correctly so that no one overpowers another – this can cause interference between sounds, resulting in poor-quality audio output from your tweeters and main speakers. Adjusting levels manually often resolves many common tweeter problems quickly and easily.
Conclusion
Installing car tweeters may seem like a daunting task, but the truth is that it’s not as difficult as you think. With just a few tools and components, you can have your new tweeters up and running quickly!
Connecting wiring, mounting the tweeters and testing them out doesn’t have to be complicated. It’s similar to building a house; all the pieces fit perfectly when done correctly.
At first, it might feel overwhelming with so many steps involved. But once you understand how each component works together, installation becomes easier.
Just take your time to make sure everything is connected properly and securely before moving on to the next step. And don’t forget: if something isn’t working right or there are any issues, troubleshooting will help you get back on track quickly.
So if you’re ready for some great-sounding music from your vehicle, try installing car tweeters – I’m sure you won’t regret it!
You’ll enjoy listening to your favourite tunes at higher-quality sound levels and appreciate doing this project yourself without having to hire someone else for assistance!