Dealing with a crankshaft sensor issue can be frustrating, but you’ve taken the right step by replacing it. Now, you might wonder what comes next to ensure your car runs smoothly and efficiently.
In this blog post, we delve into important steps to take following crankshaft sensor replacement, such as clearing error codes and verifying proper functioning of the new sensor. We’ll also help you troubleshoot common issues that may arise even after replacement so you can get back on the road confidently. So buckle up and keep reading, as we guide you through every essential detail in maintaining your vehicle’s top engine performance!
Understanding The Importance Of A Crankshaft Sensor
The crankshaft sensor plays a vital role in your car’s overall performance and efficiency, as it monitors the speed at which the crankshaft is spinning. By sending this information to the engine control unit (ECU), it allows for precise fuel injection and ignition timing, ensuring optimal engine function. This makes understanding how to manage your newly replaced crankshaft sensor all the more critical.
A failing or malfunctioning crankshaft sensor can lead to a variety of issues, such as poor engine performance, stalling, or even preventing the car from starting altogether. These symptoms often trigger a check engine light on your dashboard and error codes that can be read using an OBD diagnostic scanner. Replacing a faulty crankshaft sensor will resolve these issues; however, following proper post-replacement steps is essential for maintaining engine health and avoiding further complications.
Essential Steps To Take After Replacing A Crankshaft Sensor
After replacing a crankshaft sensor, it’s important to take essential steps such as clearing error codes, verifying sensor functioning, checking for leaks, and taking a test drive to ensure everything is working properly. Keep reading to learn more about troubleshooting common issues that may arise after replacement.
Clearing Any Error Codes
After replacing the crankshaft sensor, it is important to clear any error codes that may have been triggered due to the previous damaged sensor. To do so, you will need an OBD diagnostic scanner tool, which you can plug into your car’s OBD port. This will allow you to access the ECU and reset it so that it recognizes the new sensor and clears out any stored error codes.
It is important not to skip this step because any old saved errors could cause issues with how your engine runs or trigger false alarms for future problems. Clearing these codes provides a fresh start for your car’s onboard computer system and ensures accurate readings from all sensors related to engine performance.
Keep in mind that if there are other underlying issues with your car’s electrical systems or engine components besides just a faulty crankshaft position sensor, those errors will still be present after resetting the ECU; therefore, additional troubleshooting may be necessary.
Verification Of Sensor Functioning
After replacing the crankshaft sensor, it is crucial to verify that the newly installed sensor is functioning properly. Here are the steps to take for sensor verification:
- Start the car: Attempt to start the car and see if it starts up smoothly without any issues.
- Check engine light: Use an OBD diagnostic scanner to check for any error codes or a check engine light. If there are no error codes or check engine light, then the new sensor is likely functioning correctly.
- Sensor data: Use the OBD scanner to monitor live data from the sensor and verify that it is providing accurate readings.
- Test drive: Take the car for a test drive to ensure that there are no issues with the new sensor causing poor engine performance or misfires.
- Inspect related components: Inspect other related components such as wiring, connectors, and camshaft position sensors to ensure they are also functioning correctly.
By following these steps, you can confirm that your newly installed crankshaft sensor is working correctly and avoid any potential future issues with your car’s performance.
Checking For Leaks
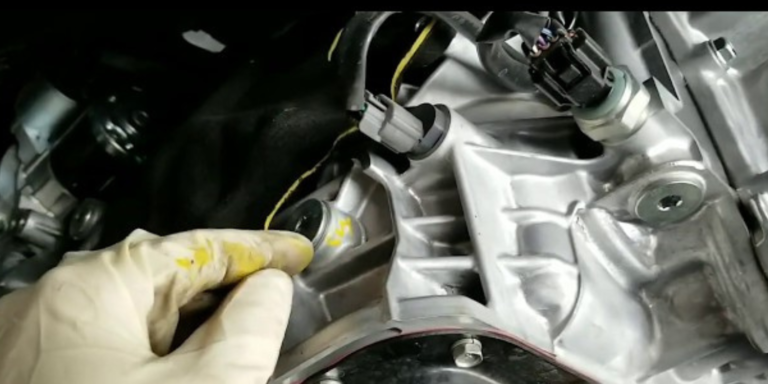
After replacing the crankshaft sensor, checking for leaks is crucial in ensuring that the new sensor installation is working effectively. Leaks can occur due to improper installation or damage to related components during replacement.
To check for leaks, inspect the sensor and surrounding areas thoroughly for any signs of oil or coolant leakage. If there are any visible leaks, it may be necessary to replace damaged gaskets or seals, which can significantly affect engine performance if ignored. Additionally, monitoring fluid levels after replacement can help identify any potential leaks early on and prevent more significant issues down the line.
Taking A Test Drive
After replacing the crankshaft sensor, taking a test drive is an important step to ensure that everything is working as it should. Here are some things to check during your test drive:
- Acceleration: Test the car’s acceleration from a stop and while in motion. If there are any delays or roughness in acceleration, this may indicate an issue with the sensor or related components.
- Idling: Check how the car idles at both low and high speeds. A rough idle could be a sign of a faulty sensor or other engine issues.
- Gear shifting: Pay attention to how smoothly the car shifts gears, particularly if you have an automatic transmission. Any hesitation or jerking could point to issues with the sensor or transmission.
- Braking: Test the brakes to make sure they engage smoothly and without issue.
- Check engine light: Keep an eye out for any signs of a persistent check engine light even after replacing the sensor.
- Performance: Take note of how well your car performs overall during your test drive, including fuel efficiency and power output.
Remember, if you notice any issues during your test drive, it may be necessary to troubleshoot further or seek professional help.
Common Issues & Troubleshooting
After replacing the crankshaft sensor, there are still some common issues that may arise. One is that the car still won’t start even after the replacement. This can be due to several reasons such as incorrect installation of the sensor, wiring damage or a faulty ECU. Troubleshooting this issue involves checking all related components and verifying proper installation of both the crankshaft and camshaft position sensors.
Another possible problem is that even after replacing the sensor, one may notice poor engine performance or misfires. This could result from engine timing issues, fuel system problems or damaged electrical connectors among other things. Taking steps like inspecting for leaks and checking for worn out engine parts can help diagnose these issues more effectively.
In conclusion, taking time to troubleshoot common post-replacement issues with your car’s crankshaft sensor can save you from spending unnecessarily on repairs and further component replacements in future. Patience is key when dealing with these kinds of problems since it requires detailed attention to detail before any repair decisions are undertaken; ensure to involve an experienced mechanic whenever necessary.
Troubleshooting Common Issues After Replacing A Crankshaft Sensor
Despite replacing the crankshaft sensor, your car may still face some issues such as check engine light remaining on, poor engine performance or the car not starting at all. Don’t worry, we’ve got you covered with our troubleshooting guide to help diagnose and fix these common issues. Keep reading to learn more!
Car Still Won’t Start
If the car still won’t start after replacing the crankshaft sensor, there may be other underlying issues at play. One possible cause could be faulty wiring, which may have been damaged during installation or due to wear and tear over time. Another possibility is that there is an issue with related components such as the battery or ignition system. It’s important to use diagnostic tools like an OBD scanner to identify any fault codes and troubleshoot accordingly.
In some cases, disconnecting the battery for an hour before attempting to start again may reset the sensor and fix starting problems. However, this is not always a guaranteed solution and further investigation may be necessary if the problem persists. Ultimately, seeking professional help from a qualified mechanic can help diagnose and fix any engine issues preventing your car from starting properly.
Check Engine Light Remains On
After replacing a crankshaft sensor, it is common to see the check engine light remain on. Here are some possible reasons and solutions:
- Check for other error codes: Use an OBD-2 diagnostic scanner to check for any other error codes that may be causing the check engine light to stay on.
- Incorrect installation: Recheck the installation of the crankshaft sensor and ensure proper alignment and connection.
- Faulty wiring: Inspect the electrical connector and related components for signs of wear or damage. Replace as necessary.
- Camshaft position sensor: If the camshaft position sensor is faulty, it can also cause the check engine light to remain on even after replacing the crankshaft sensor.
- Engine issue: If none of these solutions work, there may be an underlying issue with the engine that needs further investigation and repairs by a professional mechanic.
Remember to troubleshoot and address any issues promptly to avoid potential damage to your car’s engine in the long run.
Poor Engine Performance
Poor engine performance can be a common issue after replacing the crankshaft sensor. This is often due to incorrect installation or faulty wiring, causing the sensor to not receive proper signals from the engine. Other potential causes of poor engine performance include issues with related components such as the camshaft position sensor or fuel system.
To troubleshoot this issue, it is important to check for error codes using an OBD diagnostic scanner and inspect all electrical connections related to the crankshaft sensor. Additionally, checking for leaks or damage in any other engine components can help pinpoint underlying issues contributing to poor engine performance.
Incorrect Sensor Installation
Incorrect crankshaft sensor installation can cause a range of issues, including poor engine performance, failure to start, and error codes. Here are some common mistakes to avoid when installing a new sensor:
- Installing the sensor in the wrong location or orientation.
- Failing to properly secure the sensor after installation.
- Not tightening the bolts or screws that hold the sensor in place.
- Forgetting to reconnect any electrical connectors that were removed during installation.
- Damaging the wiring or other components while installing the sensor.
To avoid these issues, be sure to follow the manufacturer’s recommendations for installation and use caution when working with delicate sensors and wiring. Double-check your work before reassembling any parts of the engine and use an OBD diagnostic scanner to verify that no error codes are present after installation.
Faulty Wiring
When replacing a crankshaft sensor, it is important to check the wiring for any signs of damage or wear. Faulty wiring can cause the sensor to malfunction, resulting in starting issues and poor engine performance. If there are any signs of damaged or loose connections, it is essential to replace or repair them before testing the new sensor to avoid further complications.
A common issue that may arise after replacing a crankshaft sensor is still experiencing problems with starting the car. This could be due to faulty or damaged wiring that was missed during inspection. Faulty wiring can also cause miscommunications between the sensors and other components of the engine, leading to various error codes and possible engine malfunctions if left unchecked.
In summary, checking for faulty wiring should be among your top priorities when replacing a crankshaft sensor. Properly functioning sensors require secure electrical connections without any visible damage or wear in order to relay accurate information about engine operations. Any detected faults should not be ignored but dealt with promptly before testing out whether this new part fixed everything as intended by manufacturers — keeping your vehicle running smoothly and safely on roads!
When To Seek Professional Help And Conclusion
In conclusion, replacing a faulty crankshaft sensor is crucial to ensure proper engine function and prevent serious damage to your vehicle. However, it’s important to follow the essential steps after replacement such as clearing error codes, verifying sensor functioning, and checking for leaks. Troubleshooting common issues such as poor engine performance or incorrect installation is also vital. Remember that if all else fails, seeking professional help is always recommended. Don’t overlook the importance of regular maintenance to keep your car running smoothly and avoid costly repairs in the long run. With these tips in mind, you can tackle any crankshaft sensor replacement with confidence!