Has your vehicle been experiencing battery issues even after installing a new alternator? It can be incredibly frustrating trying to figure out why the battery isn’t charging, despite having what should be perfectly functional parts.
In this blog post, we’ll dive into the possible reasons for a new alternator not charging the battery and provide some troubleshooting tips and solutions to get you back on the road. Keep reading to learn more about resolving this issue and preventing it from happening in the future!
TLDR
1. Corrosion on the battery terminals can prevent the alternator from charging the battery.
2. Worn carbon brushes or a damaged alternator can also cause the alternator to not charge the battery.
3. Replacing the alternator, getting a new battery, changing the ECU or fuses, or fixing/replacing the voltage regulator can help fix the issue.
4. If the alternator is working properly but the battery is still not charging, it could be due to a bad voltage regulator.
5. Checking for corrosion and loose connections on the battery terminal connectors and terminals can help fix the issue of a new battery and new alternator still not charging.
6. There are five common causes of an alternator not charging: computer error, broken belt or pulley, blown fuse, wiring issues, and a bad alternator or battery.
7. It is important to check the wirings, fuse, voltage regulator, serpentine belt, and new battery if the battery light is still on despite having a new battery and alternator.
8. A good alternator and good battery can still not charge if there is an issue with the voltage regulator, wiring, or other components.
9. Alternators can stop charging randomly due to issues with the rotor, stator, or other internal components.
10. A brand new alternator may not charge a brand new battery if there is an issue with the wiring, voltage regulator, or other components.
Reasons For A New Alternator Not Charging The Battery
There are several potential reasons for a new alternator not charging the battery, including issues with battery terminals, malfunctioning alternators, defective voltage regulators, problems with wiring or fuses, and damaged belts or pulleys.
Issues With Battery Terminals
One common reason for a new alternator not charging the battery is corrosion or loose connections on the battery terminals. Over time, corrosion can build up around the terminals and connectors, impeding proper electrical flow between the battery and alternator. This obstruction may result in insufficient power to charge your car’s battery, even with a properly functioning new alternator.
In some cases, corroded terminals could also cause intermittent charging issues – where the alternator appears to work fine at times but suddenly stops charging without warning. To prevent these issues from occurring or persisting, it’s essential to regularly inspect your car’s battery terminals for any signs of corrosion buildup, dirt, debris or damaged connectors. A simple way of cleaning them involves using a wire brush and a mixture of water and baking soda to scrub away the unwanted substances carefully.
Additionally, ensure that all connections are tightly secured so that there is optimal contact between each terminal connector and its respective terminal post. By maintaining clean and tight connections at your battery terminals, you eliminate one potential culprit behind an uncharged new alternator being unable to juice up your vehicle’s most critical energy source.
Malfunctioning Alternator
A malfunctioning alternator can be one of the reasons why a new alternator is not charging the battery. The alternator is responsible for producing voltage and keeping the battery charged while the car is running. If it’s not functioning properly, then it won’t be able to recharge the battery, which can lead to issues with starting your vehicle or even stalling out while driving.
A common cause of a malfunctioning alternator is worn carbon brushes, which are responsible for creating contact between moving parts inside the alternator. Over time, these brushes wear down and need to be replaced in order for the alternator to work correctly.
In addition to worn carbon brushes, other issues with an alternator can also cause it to malfunction and fail at charging a new battery. These include damaged internal components like rotors or stators, as well as electrical faults that can occur within its wiring or connections. It’s important to troubleshoot these potential problems before assuming that your new battery isn’t being charged properly by a faulty alternator. By diagnosing any underlying issues early on, you’ll be able to fix them quickly and avoid costly repairs down the road.
Defective Voltage Regulator
Another reason why a new alternator may not be charging the battery is due to a defective voltage regulator. The voltage regulator controls the flow of electricity from the alternator to the battery and ensures that the battery receives an optimal charge. If it malfunctions, it can cause low or high voltage output, which can affect the battery’s ability to charge.
Signs of a faulty voltage regulator include dimming headlights, flickering dashboard lights, and varying electrical system performance. Sometimes, fixing or replacing just the voltage regulator can solve the issue of a new alternator not charging the battery. However, in some cases, it may require replacing both components.
It is important to diagnose whether a defective voltage regulator is causing an issue by testing for proper voltages at various points in your car’s electrical system with special tools like multimeters and diagnostic scanners. Checking for corrosion buildup on wiring connections while diagnosing this issue may also help identify any other problems contributing to this malfunctioning part.
Problems With Wiring Or Fuses
One of the common issues that can cause a new alternator not to charge the battery is problems with wiring or fuses. If there’s an issue with the wiring, it could be due to frayed wires, loose connections, or even melted wire insulation. Similarly, blown fuses can also prevent electricity from flowing properly between the alternator and battery.
To identify if wiring or fuse issues are causing the problem, you’ll need to inspect all related wires and connectors for signs of damage or wear. Check carefully for any melting or exposed parts of wires and ensure that they sit securely in their respective sockets. Additionally, examine your vehicle’s fuse box to see if any fuses are either burnt out or broken.
Once you’ve identified which component is faulty, replacing it should do the trick. Make sure that all new connections are tight and secure before reassembling everything back into place. By taking care of these potential problems quickly, you’ll save yourself time and frustration in trying to track down more complex solutions later on down the road!
Damaged Belt Or Pulley
Another common reason why a new alternator might not charge the battery is due to a damaged belt or pulley. The serpentine belt plays an essential role in powering several components of the engine, including the alternator. If this belt becomes worn or damaged, it can prevent the alternator from being able to charge your car’s battery properly.
Similarly, a damaged pulley can also cause issues with charging. Over time, wear and tear on the pulley can leave it cracked, wobbly or misaligned which ultimately affects how well your alternator performs its job of keeping your battery charged up.
To verify if this is causing your issue you must check for these things visually by inspecting both components physically under-the-hood. Look for any signs of cracks on belts along with defects such as missing teeth; do note that sometimes there may be no visible damage at all so a diagnostic test may be required instead just to accurately identify any underlying fault.
If you find any problems with either component during inspection – it’s important to replace them immediately before they cause further harm to other parts of your vehicle’s electrical system!
Troubleshooting Steps To Identify The Issue
To identify the issue of a new alternator not charging the battery, there are several steps you can take, including checking battery voltage and connections, inspecting the alternator belt and pulley, testing alternator output, and examining fuses and relays.
Check Battery Voltage And Connections
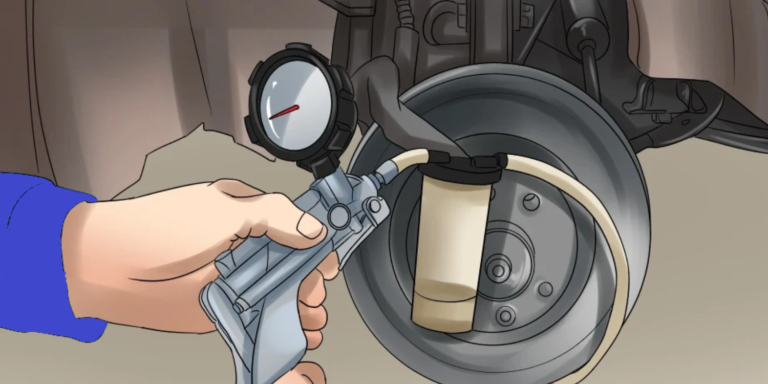
One of the first steps to take when troubleshooting a new alternator not charging the battery is to check the battery voltage and connections. A low voltage reading could indicate that there’s an issue with the battery itself, such as sulfation or a dead cell, which can prevent it from receiving charge properly. On the other hand, loose or corroded battery terminals and connectors can also cause poor electrical contact which would disrupt current flow between the alternator and battery.
To check for issues with both voltage and connections, use a multimeter to measure the voltage across the positive and negative terminals of the battery. Ideally, you should see a reading of around 12 volts or above if your car is off, indicating that your battery has enough power. When starting your engine and revving it up slightly (around 2000 RPM), you should also see an increase in voltage by around 1-2 volts if everything is working correctly.
If you notice inconsistent readings or lower than expected voltages on either test, try tightening any loose terminal bolts and cleaning away any corrosion on them. If this doesn’t fix things initially, then consider running some tests again while wiggling connectors or tapping lightly along wiring looms in case there are continuity issues at these points.
Finally, be sure to remove any dirt build-up using wire brushes when inspecting cable ends for a consistent connection over time.
Inspect Alternator Belt And Pulley
The serpentine belt and pulley play a crucial role in the charging system of your car. If the belt is worn, stretched, or damaged, it can cause the alternator to not charge properly. Inspect the belt regularly for signs of wear, such as cracks or fraying on the ribs.
Similarly, if there are any issues with the pulley that drives the belt, it can also inhibit proper charging from occurring. Make sure that there is no damage to the pulley itself and that it spins freely without any noises or wobbles.
By ensuring that both components are functioning correctly, you’ll have a better chance of avoiding an alternator failure and prolonging your battery’s life. It’s important to remember that even small issues with these parts can lead to bigger problems down the line. So don’t ignore any strange sounds coming from under your hood – take action immediately before things get worse!
Test Alternator Output
Testing the output of your new alternator is an essential step in troubleshooting why it isn’t charging the battery. To test your alternator’s output, you’ll need a multimeter tool. First, start by turning on your car’s engine and let it idle for a few minutes to warm up. Then, use the multimeter to measure the voltage across the battery terminals while the engine is running. Ideally, you should get a reading between 13-14 volts if everything is working correctly.
If you’re getting less than that or no reading at all, there might be an issue with your alternator’s output. It could indicate that there’s something wrong with its internal components like carbon brushes or wiring problems. If this happens, replacing these parts may help resolve the issue and ensure that your new alternator provides enough power to charge up your battery properly.
Remember that testing alternator output alone can’t tell you everything about why it isn’t charging properly – you must also check other vital components such as fuses and wires. However, assessing its output is one important piece of information that allows us to determine whether or not our new alternator is functioning effectively in providing power back into our car batteries again!
Check Fuse And Relay
One of the most common causes of a new alternator not charging the battery is a blown fuse or faulty relay. When there is an issue with the alternator, it can cause the electrical system to overload and blow a fuse. So, if you’ve installed a new alternator and still have issues with your battery charging, checking for blown fuses should be one of your first steps.
To check the fuses and relays, start by locating the fuse box in your vehicle – this can be found under the hood or inside your car. Look for any fuses that are visibly damaged or burnt out and replace them as needed. If all of the fuses appear to be intact, then try swapping out some of the relays to see if that solves the problem.
It’s important to note that even if you do find blown fuses or faulty relays, this may not necessarily solve all of your issues with battery charging. However, it’s always best to rule these possibilities out before diving into more complicated troubleshooting procedures.
Solutions For A New Alternator Not Charging The Battery
To fix the issue of a new alternator not charging the battery, try replacing faulty parts, tightening or replacing electrical connections, charging or replacing the battery, and repairing or replacing the alternator. But wait there’s more tips to prevent future issues! Keep reading to learn more.
Replace Faulty Parts
If you have identified a faulty part causing your alternator to not charge the battery, it is important to replace it promptly. Faulty components such as a damaged voltage regulator or malfunctioning alternator can disrupt the charging process and cause further damage to your vehicle’s electrical system. If left unattended, this issue can lead to more significant problems in the long run.
Replacing faulty parts can vary in complexity and cost depending on which components need repair or replacement. In some cases, tightening or replacing electrical connections may be all that is necessary. However, if the problem lies within the alternator or voltage regulator, they will likely require complete replacement. Making these repairs immediately will help ensure that your car remains running optimally and prevent any additional issues from developing down the line.
Tighten Or Replace Electrical Connections
One common cause of a new alternator not charging the battery is loose or corroded electrical connections. Over time, the clamps and connectors that attach to the battery terminals can become corroded and prevent a good connection from forming between the battery and alternator. This can lead to voltage drops, which means your battery won’t charge properly even if your alternator is working correctly.
To fix this issue, start by cleaning any corrosion off the clamps and connectors using a wire brush or sandpaper. Then make sure all connections are tight by gently wiggling them with your fingers; they should not move easily. If you find any damaged cables or connectors, replace them as soon as possible.
Remember: always disconnect the negative cable before working on electrical components in your car! Doing so will reduce the risk of injury or damage to sensitive electronic components in your vehicle.
Charge Or Replace Battery
If your new alternator is not charging the battery, one of the first things to check is the health of your battery. A weak or damaged battery can cause issues with charging, even if you have a brand new alternator. To test if your battery is causing the problem, use a voltmeter to measure its voltage while disconnected from the car’s electrical system. If it reads less than 12 volts, it may need to be charged or replaced.
If you do need a new battery, make sure to choose one that matches your car’s specifications and voltage requirements. It’s also important to ensure that all connections are tight and free of corrosion before installing the new battery. In some cases, simply recharging the existing battery may solve the issue temporarily, but keep in mind that an old or damaged battery will likely cause more problems down the road.
Remember that even with a healthy new alternator and fresh battery, there could still be other underlying issues causing charging problems in your vehicle. Be sure to follow all troubleshooting steps thoroughly before investing in costly replacements or repairs.
Repair Or Replace Alternator
If the alternator is found to be faulty, it may need either repair or replacement depending on the extent of the damage. It’s important to note that rewinding an alternator rotor or stator can only be done by a specialist and may not always be cost-effective compared to buying a new one.
When deciding whether to repair or replace your alternator, consider factors such as age and mileage of your vehicle, quality and expense of parts components, as well as labor costs. For cars with high miles and/or significant wear-and-tear on the electrical system, replacing the alternator outright might make more sense than attempting repairs.
Ultimately though, whether you choose repair or replacement for your alternator depends on how overall health of your vehicle’s charging system. If you’re experiencing other symptoms like flickering lights when idling at stoplights or dimming headlights when accelerating from a dead stop – these are signs that there could be additional electrical problems beyond just a bad battery or worn out voltage regulator.
Conclusion And Tips For Preventing Future Issues
In conclusion, a new alternator not charging the battery can be frustrating and confusing. However, by following the troubleshooting steps outlined above, you can quickly identify and fix the issue.
Remember to check for corrosion on battery terminals, faulty wiring or fuses, damaged belts or pulleys and malfunctioning voltage regulators. Regular maintenance of your car’s electrical system is crucial in preventing such issues from arising in the future.
So make sure to keep an eye on your battery’s health along with inspecting all other parts involved in charging your vehicle’s battery frequently. By doing so, you’ll ensure that your car keeps running smoothly without any hiccups!
Wrapping Up
It’s not uncommon for a brand new alternator to fail at charging the battery, leaving you stranded with a dead car. There are several reasons why this can happen. Corrosion on the battery terminals is a common issue that prevents proper charging. Also, if there is an issue with wiring, fuses, or the voltage regulator, your new alternator may still not be able to charge the battery properly.
To troubleshoot this issue, start by checking the connections and voltage of both the battery and alternator. It’s also important to inspect components like belts and pulleys for any damage or wear that could be hindering their performance. Once you’ve identified what’s causing your new alternator to fail at charging your battery, solutions like replacing faulty parts or tightening electrical connections can help fix it.
It’s essential to take care of your car’s electrical system as neglecting it can lead to expensive repairs down the road. By understanding how your car works and regularly maintaining its different parts like batteries and alternators, you’ll save yourself from frustrating breakdowns in future – keeping both yourself and your wallet happy!